To follow this tutorial (Linux), besides the Beaglebone Black (BBB), you will need a computer to build the NuttX OS, one microSD card, one serial-usb adapter and any serial software to interfaces with BBB. After complete the check list, is time to execute some commands.
Setting up the Development Environment to Nuttx
$ sudo apt-get install automake bison build-essential flex gcc-arm-none-eabi gperf git libncurses5-dev libtool libusb-dev libusb-1.0.0-dev pkg-config
$ mkdir ~/nuttxspace
$ cd ~/nuttxspace
$ git clone http://repo.or.cz/r/openocd.git
$ cd ~/nuttxspace/openocd
$ ./bootstrap
$ ./configure --enable-internal-jimtcl --enable-maintainer-mode --disable-werror --disable-shared --enable-stlink --enable-jlink --enable-rlink --enable-vslink --enable-ti-icdi --enable-remote-bitbang
$ make
$ sudo make install
Compiling the NuttX Source Code
$ cd ..
$ git clone https://bitbucket.org/nuttx/nuttx
$ git clone https://bitbucket.org/nuttx/apps
$ git clone https://bitbucket.org/nuttx/tools
$ cd tools/kconfig-frontends/
$ ./configure
$ make
$ sudo make install
$ sudo ldconfig
$ cd ../..
$ cd nuttx/tools/
$ ./configure.sh beaglebone-black/nsh
$ cd ..
$ make menuconfig
$ make
$ ls -l nuttx.bin
Loading the Firmware
At this point the compilation is done and the nuttx.bin was generated in the root folder. Copy this file to the microSD card, in root directory, before it don’t forget to format the microSD card as FAT32.
The J1 connector in BBB is configured as:
- PIN 1: GND
- PIN 2: NC (Not Connected)
- PIN 3: NC (Not Connected)
- PIN 4: RX
- PIN 5: TX
- PIN 6: NC (Not Connected)

Now you will need to connect both GND signal (BBB and Serial Adapter) and connect the TX from BBB into RX of Serial Adapter and connect the RX from BBB into TX of Serial Adapter.
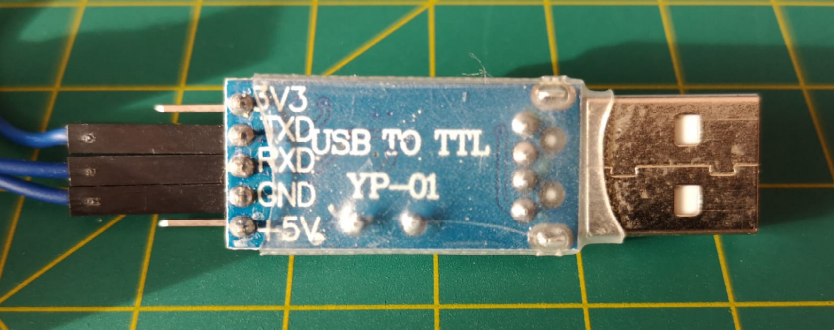
Connect the serial adapter in some USB interface of your laptop, then open your preferred serial program to connect to the BBB. In my case, I am using the minicom and it is started with the following command:
$ sudo minicom -D /dev/ttyUSB0 -b 115200
As default the minicom opens its connection using 8-N-1 configuration, that means 8 bit data length, non parity and 1 stop bit.
After this step you will need to power on the BBB and you will see the U-Boot startup, then press any key to interrupt the startup. Now you should have the U-Boot terminal and you will need to load the firmware generated before (nuttx.bin).
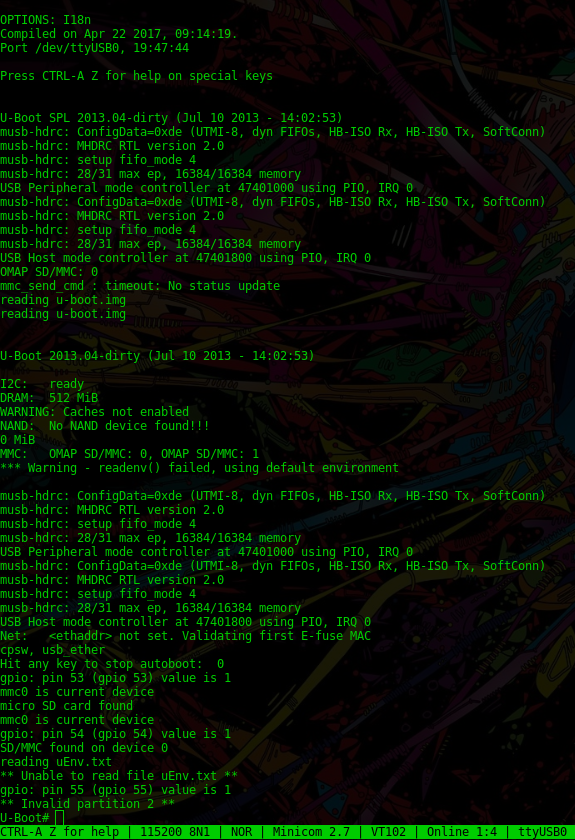
Now you will need to type the following commands to start the application:
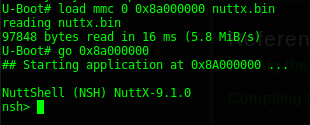
load mmc 0 0x8a000000 nuttx.bin
go 0x8a000000
References
Setting the Development Environment for Nuttx
