This post brings more details about the execution of Yang, OpenConfig, and gNMI Basics Tutorial that is part of the Next Generation SDN Tutorial. And it will cover the following topics:
- Understanding the YANG language
- Understand YANG encoding
- Understanding YANG-enabled transport protocols (using gNMI)
1. Understanding the YANG language
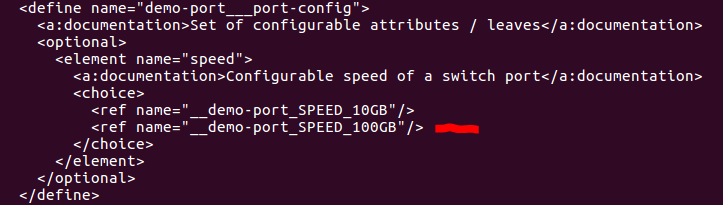
We start with a simple YANG module called demo-port in
yang/demo-port.yang
Take a look at the model and try to derive the structure. What are valid values for each of the leaf nodes?
This model is self contained, so it isn’t too difficult to work it out. However, most YANG models are defined over many files that makes it very complicated to work out the overall structure.
To make this easier, we can use a tool called pyang to try to visualize the
structure of the model.
Start by entering the yang-tools Docker container:
$ make yang-tools
bash-4.4#
Next, run pyang on the demo-port.yang model:
bash-4.4# pyang -f tree demo-port.yang
You should see a tree representation of the demo-port module. Does this match
your expectations?
Extra Credit: Try to add a new leaf node
to port-config or port-state grouping, then rerun pyang and see where your
new leaf was added.
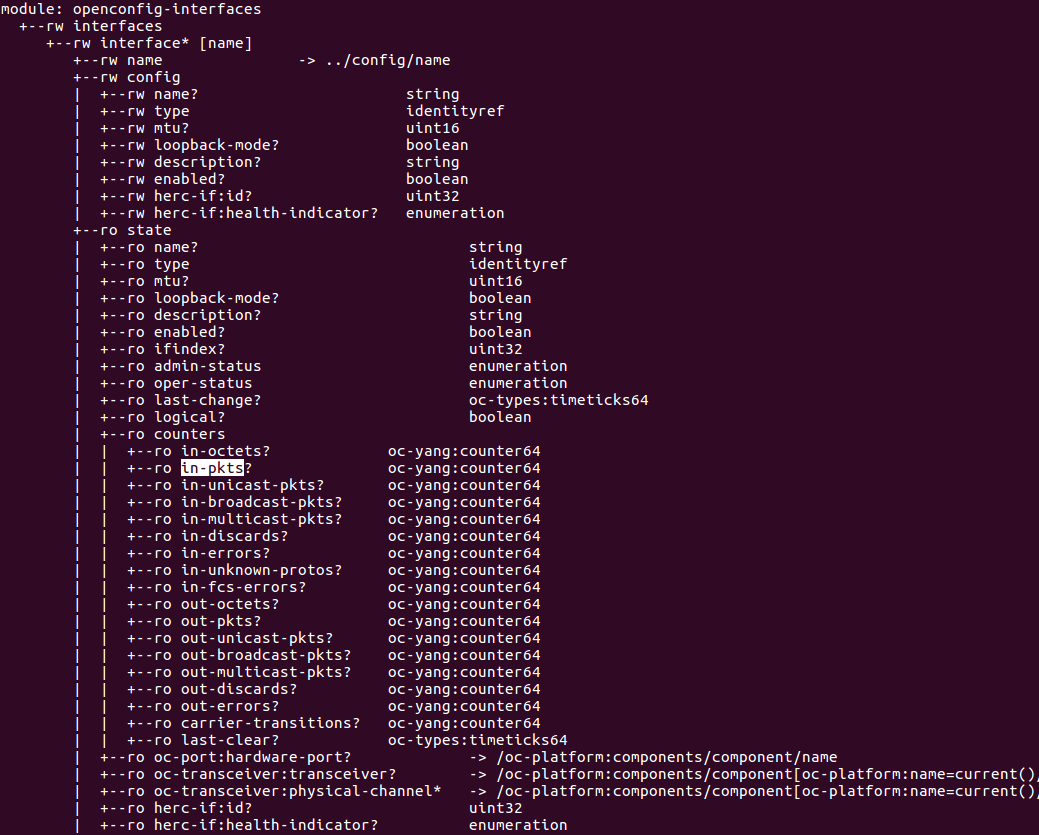
We can also use pyang to visualize a more complicated set of models, like the
set of OpenConfig models that Stratum uses.
These models have already been loaded into the yang-tools container in the
/models directory.
bash-4.4# pyang -f tree \
    -p ietf \
    -p openconfig \
    -p hercules \
    openconfig/interfaces/openconfig-interfaces.yang \
    openconfig/interfaces/openconfig-if-ethernet.yang  \
    openconfig/platform/* \
    openconfig/qos/* \
    openconfig/system/openconfig-system.yang \
    hercules/openconfig-hercules-*.yang  | less
You should see a tree structure of the models displayed in less. You can use
the Arrow keys or j/k to scroll up and down. Type q to quit.
In the interface model, we can see the path to enable or disable an interface:
interfaces/interface[name]/config/enabled
What is the path to read the number of incoming packets (in-pkts) on an interface?
- interface/state/counters/in-pkts
Extra Credit: Take a look at the models in the
/models directory or browse them on Github:
https://github.com/openconfig/public/tree/master/release/models
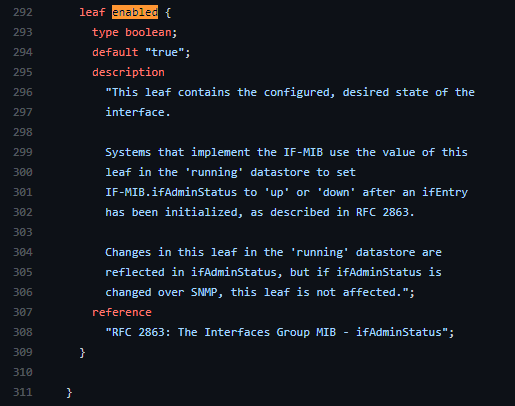
Try to find the description of the enabled or in-pkts leaf nodes.
Hint: Take a look at the openconfig-interfaces.yang file.

2. Understand YANG encoding
There is no specific YANG data encoding, but data adhering to YANG models can be encoded into XML, JSON, or Protobuf (among other formats). Each of these formats has it’s own schema format.
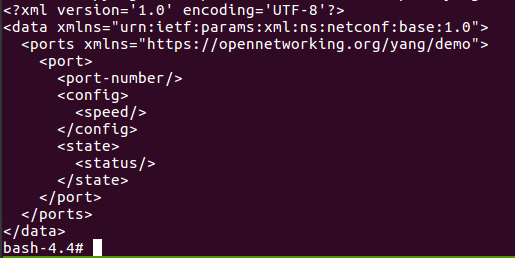
First, we can look at YANG’s first and canonical representation format XML. To see a empty skeleton of data encoded in XML, run:
bash-4.4# pyang -f sample-xml-skeleton demo-port.yang
This skeleton should match the tree representation we saw in part 1.
We can also use pyang to generate a DSDL schema based on the YANG model:
bash-4.4# pyang -f dsdl demo-port.yang | xmllint --format -
The first part of the schema describes the tree structure, and the second part describes the value constraints for the leaf nodes.
Extra credit: Try adding new speed identity (e.g. SPEED_100G) or changing
the range for port-number values in demo-port.yang, then rerun pyang -f
dsdl. Do you see your changes reflected in the DSDL schema?
- Yes.
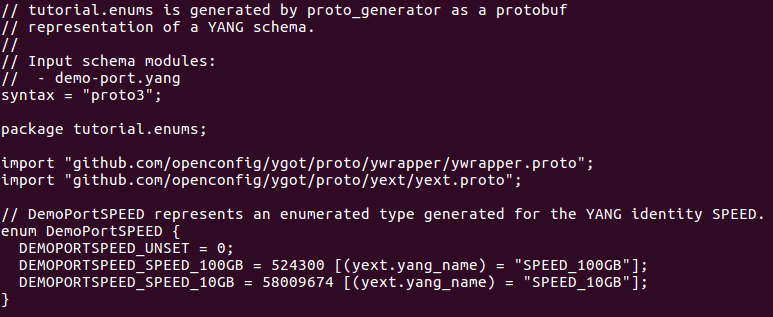
Next, we will look at encoding data using Protocol Buffers (protobuf). The
protobuf encoding is a more compact binary encoding than XML, and libraries can
be automatically generated for dozens of languages. We can use
ygot’s proto_generator to generate
protobuf messages from our YANG model.
bash-4.4# proto_generator -output_dir=/proto -package_name=tutorial demo-port.yang
proto_generator will generate two files:
/proto/tutorial/demo_port/demo_port.proto/proto/tutorial/enums/enums.proto
Open demo_port.proto using less:
bash-4.4# less /proto/tutorial/demo_port/demo_port.proto
This file contains a top-level Ports message that matches the structure defined
in the YANG model. You can see that proto_generator also adds a
yext.schemapath custom option to each protobuf message field that explicitly
maps to the YANG leaf path. Enums (like tutorial.enums.DemoPortSPEED) aren’t
included in this file, but proto_generator puts them in a separate file:
enums.proto
Open enums.proto using less:
bash-4.4# less /proto/tutorial/enums/enums.proto
You should see an enum for the 10GB speed, along with any other speeds that you added if you completed the extra credit above.
We can also use proto_generator to build the protobuf messages for the
OpenConfig models that Stratum uses:
bash-4.4# proto_generator \
    -generate_fakeroot \
    -output_dir=/proto \
    -package_name=openconfig \
    -exclude_modules=ietf-interfaces \
    -compress_paths \
    -base_import_path= \
    -path=ietf,openconfig,hercules \
    openconfig/interfaces/openconfig-interfaces.yang \
    openconfig/interfaces/openconfig-if-ip.yang \
    openconfig/lacp/openconfig-lacp.yang \
    openconfig/platform/openconfig-platform-linecard.yang \
    openconfig/platform/openconfig-platform-port.yang \
    openconfig/platform/openconfig-platform-transceiver.yang \
    openconfig/platform/openconfig-platform.yang \
    openconfig/system/openconfig-system.yang \
    openconfig/vlan/openconfig-vlan.yang \
    hercules/openconfig-hercules-interfaces.yang \
    hercules/openconfig-hercules-platform-chassis.yang \
    hercules/openconfig-hercules-platform-linecard.yang \
    hercules/openconfig-hercules-platform-node.yang \
    hercules/openconfig-hercules-platform-port.yang \
    hercules/openconfig-hercules-platform.yang \
    hercules/openconfig-hercules-qos.yang \
    hercules/openconfig-hercules.yang
You will find openconfig.proto and enums.proto in the /proto/openconfig directory.
Extra Credit: Try to find the Protobuf message fields used to enable a port or get the ingress packets counter in the protobuf messages.
Hint: Searching by schemapath might help.


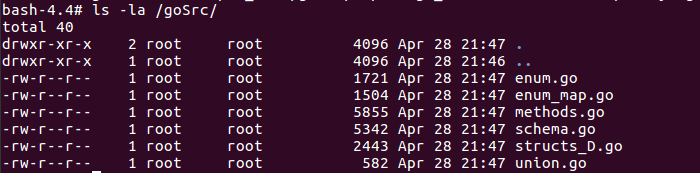
ygot can also be used to generate Go structs that adhere to the YANG model
and that are capable of validating the structure, type, and values of data.
Extra Credit: If you have extra time or are interested in using YANG and Go
together, try generating Go code for the demo-port module.
bash-4.4# mkdir -p /goSrc
bash-4.4# generator -output_dir=/goSrc -package_name=tutorial demo-port.yang
Take a look at the Go files in /goSrc.
You can now quit out of the container (using Ctrl-D or exit).
3. Understanding YANG-enabled transport protocols
There are several YANG-model agnostic protocols that can be used to get or set data that adheres to a model, like NETCONF, RESTCONF, and gNMI.
This part focuses on using the protobuf encoding over gNMI.
First, make sure your Mininet container is still running.
$ make start
docker-compose up -d
mininet is up-to-date
onos is up-to-date
If you see the following output, then Mininet was not running:
Starting mininet ... done
Starting onos    ... done
You will need to go back to Exercise 1 and install forwarding rules to
re-establish pings between h1a and h1b for later parts of this exercise.
If you could not complete Exercise 1, you can use the following P4Runtime-sh commands to enable connectivity:
te = table_entry['IngressPipeImpl.l2_exact_table'](action='IngressPipeImpl.set_egress_port')
te.match['hdr.ethernet.dst_addr'] = '00:00:00:00:00:1A'
te.action['port_num'] = '3'
te.insert()

te = table_entry['IngressPipeImpl.l2_exact_table'](action='IngressPipeImpl.set_egress_port')
te.match['hdr.ethernet.dst_addr'] = '00:00:00:00:00:1B'
te.action['port_num'] = '4'
te.insert()
Next, we will use a gNMI client CLI
to read the all of the configuration from the Stratum switche leaf1 in our
Mininet network:
$ util/gnmi-cli --grpc-addr localhost:50001 get /
The first part of the output shows the request that was made by the CLI:
REQUEST
path {
}
type: CONFIG
encoding: PROTO
The path being requested is the empty path (which means the root of the config tree), the type of data is just the config tree, and the requested encoding for the response is protobuf.
The second part of the output shows the response from Stratum:
RESPONSE
notification {
  update {
    path {
    }
    val {
      any_val {
        type_url: "type.googleapis.com/openconfig.Device"
        value: \252\221\231\304\001\... TRUNCATED
      }
    }
  }
}
You can see that Stratum provides a response of type openconfig.Device, which
is the top-level message defined in openconfig.proto. The response is the
binary encoding of the data based on the protobuf message.
The value is not human readable, but we can translate the reply using a utility that converts between the binary and textual representations of the protobuf message.
We can rerun the command, but this time pipe the output through the converter
utility (then pipe that output to less to make scrolling easier):
$ util/gnmi-cli --grpc-addr localhost:50001 get / | util/oc-pb-decoder | less
The contents of the response should now be easier to read. Scroll down to the first
interface. Is the interface enabled? What is the speed of the port?
Extra credit: Can you find in-pkts? If not, why do you think they are
missing?
One of the benefits of gNMI is it’s “schema-less” encoding, which allows clients or devices to update only the paths that need to be updated. This is particularly useful for subscriptions.
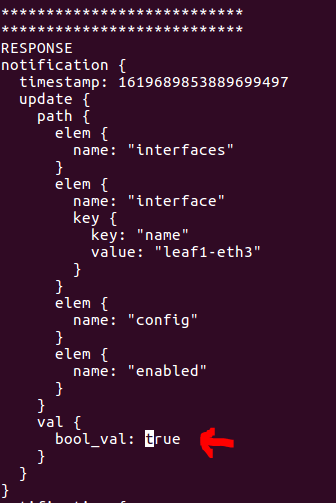
First, let’s try out the schema-less representation by requesting the
configuration port between leaf1 and h1a:
$ util/gnmi-cli --grpc-addr localhost:50001 get \
    /interfaces/interface[name=leaf1-eth3]/config
You should see this response containing 2 leafs under config - enabled and health-indicator:
RESPONSE
notification {
  update {
    path {
      elem {
        name: "interfaces"
      }
      elem {
        name: "interface"
        key {
          key: "name"
          value: "leaf1-eth3"
        }
      }
      elem {
        name: "config"
      }
      elem {
        name: "enabled"
      }
    }
    val {
      bool_val: true
    }
  }
}
notification {
  update {
    path {
      elem {
        name: "interfaces"
      }
      elem {
        name: "interface"
        key {
          key: "name"
          value: "leaf1-eth3"
        }
      }
      elem {
        name: "config"
      }
      elem {
        name: "health-indicator"
      }
    }
    val {
      string_val: "GOOD"
    }
  }
}
The schema-less representation provides and update for each leaf containing
both the path the value of the leaf. You can confirm that the interface
is enabled (set to true).
Next, we will subscribe to the ingress unicast packet counters for the interface
on leaf1 attached to h1a (port 3):
$ util/gnmi-cli --grpc-addr localhost:50001 \
    --interval 1000 sub-sample \
    /interfaces/interface[name=leaf1-eth3]/state/counters/in-unicast-pkts
The first part of the output shows the request being made by the CLI:
REQUEST
subscribe {
  subscription {
    path {
      elem {
        name: "interfaces"
      }
      elem {
        name: "interface"
        key {
          key: "name"
          value: "leaf1-eth3"
        }
      }
      elem {
        name: "state"
      }
      elem {
        name: "counters"
      }
      elem {
        name: "in-unicast-pkts"
      }
    }
    mode: SAMPLE
    sample_interval: 1000
  }
  updates_only: true
}
We have the subscription path, the type of subscription (sampling) and the sampling rate (every 1000ms, or 1s).
The second part of the output is a stream of responses:
RESPONSE
update {
  timestamp: 1567895852136043891
  update {
    path {
      elem {
        name: "interfaces"
      }
      elem {
        name: "interface"
        key {
          key: "name"
          value: "leaf1-eth3"
        }
      }
      elem {
        name: "state"
      }
      elem {
        name: "counters"
      }
      elem {
        name: "in-unicast-pkts"
      }
    }
    val {
      uint_val: 1592
    }
  }
}
Each response has a timestamp, path, and new value. Because we are sampling, you should see a new update printed every second. Leave this running, while we generate some traffic.
In another window, open the Mininet CLI and start a ping:
$ make mn-cli
*** Attaching to Mininet CLI...
*** To detach press Ctrl-D (Mininet will keep running)
mininet> h1a ping h1b
In the first window, you should see the uint_val increase by 1 every second
while your ping is still running. (If it’s not exactly 1, then there could be
other traffic like NDP messages contributing to the increase.)
You can stop the gNMI subscription using Ctrl-C.
Finally, we will monitor link events using gNMI’s on-change subscriptions.
Start a subscription for the operational status of the first switch’s first port:
$ util/gnmi-cli --grpc-addr localhost:50001 sub-onchange \
    /interfaces/interface[name=leaf1-eth3]/state/oper-status
You should immediately see a response which indicates that port 1 is UP:
RESPONSE
update {
  timestamp: 1567896668419430407
  update {
    path {
      elem {
        name: "interfaces"
      }
      elem {
        name: "interface"
        key {
          key: "name"
          value: "leaf1-eth3"
        }
      }
      elem {
        name: "state"
      }
      elem {
        name: "oper-status"
      }
    }
    val {
      string_val: "UP"
    }
  }
}
In the shell running the Mininet CLI, let’s take down the interface on leaf1
connected to h1a:
mininet> sh ifconfig leaf1-eth3 down
You should see a response in your gNMI CLI window showing that the interface on
leaf1 connected to h1a is DOWN:
RESPONSE
update {
  timestamp: 1567896891549363399
  update {
    path {
      elem {
        name: "interfaces"
      }
      elem {
        name: "interface"
        key {
          key: "name"
          value: "leaf1-eth3"
        }
      }
      elem {
        name: "state"
      }
      elem {
        name: "oper-status"
      }
    }
    val {
      string_val: "DOWN"
    }
  }
}
We can bring back the interface using the following Mininet command:
mininet> sh ifconfig leaf1-eth3 up
You should see another response in your gNMI CLI window that indicates the
interface is UP.
Extra credit: We can also use gNMI to disable or enable an interface.
Leave your gNMI subscription for operational status changes running.
In the Mininet CLI, start a ping between two hosts.
mininet> h1a ping h1b
You should see replies being showed in the Mininet CLI.
In a third window, we will use the gNMI CLI to change the configuration value of
the enabled leaf from true to false.
$ util/gnmi-cli --grpc-addr localhost:50001 set \
    /interfaces/interface[name=leaf1-eth3]/config/enabled \
    --bool-val false
In the gNMI set window, you should see a request indicating the new value for the
enabled leaf:
REQUEST
update {
  path {
    elem {
      name: "interfaces"
    }
    elem {
      name: "interface"
      key {
        key: "name"
        value: "leaf1-eth3"
      }
    }
    elem {
      name: "config"
    }
    elem {
      name: "enabled"
    }
  }
  val {
    bool_val: false
  }
}
In the gNMI subscription window, you should see a new response indicating that
the operational status of leaf1-eth3 is DOWN:
RESPONSE
update {
  timestamp: 1567896891549363399
  update {
    path {
      elem {
        name: "interfaces"
      }
      elem {
        name: "interface"
        key {
          key: "name"
          value: "leaf1-eth3"
        }
      }
      elem {
        name: "state"
      }
      elem {
        name: "oper-status"
      }
    }
    val {
      string_val: "DOWN"
    }
  }
}
And in the Mininet CLI window, you should observe that the ping has stopped working.
Next, we can re-nable the port:
$ util/gnmi-cli --grpc-addr localhost:50001 set \
    /interfaces/interface[name=leaf1-eth3]/config/enabled \
    --bool-val true
You should see another update in the gNMI subscription window indicating the
interface is UP, and the ping should resume in the Mininet CLI wondow.