This post brings more details about the execution of Using ONOS as the Control Plane Tutorial that is part of the Next Generation SDN Tutorial. And it will cover the following topics:
- Start ONOS along with a set of built-in apps for basic services such as topology discovery
- Load a custom ONOS app and pipeconf
- Push a configuration file to ONOS to discover and control the
stratum_bmv2switches using P4Runtime and gNMI - Access the ONOS CLI and UI to verify that all
stratum_bmv2switches have been discovered and configured correctly.
1. Start ONOS
In a terminal window, type:
$ make restart
This command will restart the ONOS and Mininet containers, in case those were running from previous exercises, clearing any previous state.
The parameters to start the ONOS container are specified in docker
-compose.yml. The container is configured to pass the
environment variable ONOS_APPS, used to define the built-in apps to load
during startup.
In our case, this variable has value:
ONOS_APPS=gui2,drivers.bmv2,lldpprovider,hostprovider
requesting ONOS to pre-load the following built-in apps:
gui2: ONOS web user interface (available at http://localhost:8181/onos/ui)drivers.bmv2: BMv2/Stratum drivers based on P4Runtime, gNMI, and gNOIlldpprovider: LLDP-based link discovery application (used in Exercise 4)hostprovider: Host discovery application (used in Exercise 4)
Once ONOS has started, you can check its log using the make onos-log command.
To verify that all required apps have been activated, run the following
command in a new terminal window to access the ONOS CLI. Use password rocks
when prompted:
$ make onos-cli
If you see the following error, then ONOS is still starting; wait a minute and try again.
ssh_exchange_identification: Connection closed by remote host
make: *** [onos-cli] Error 255
When you see the Password prompt, type the default password: rocks.
Then type the following command in the ONOS CLI to show the list of running apps:
onos> apps -a -s
Make sure you see the following list of apps displayed:
*   5 org.onosproject.protocols.grpc        2.2.2    gRPC Protocol Subsystem
*   6 org.onosproject.protocols.gnmi        2.2.2    gNMI Protocol Subsystem
*  29 org.onosproject.drivers               2.2.2    Default Drivers
*  34 org.onosproject.generaldeviceprovider 2.2.2    General Device Provider
*  35 org.onosproject.protocols.p4runtime   2.2.2    P4Runtime Protocol Subsystem
*  36 org.onosproject.p4runtime             2.2.2    P4Runtime Provider
*  37 org.onosproject.drivers.p4runtime     2.2.2    P4Runtime Drivers
*  42 org.onosproject.protocols.gnoi        2.2.2    gNOI Protocol Subsystem
*  52 org.onosproject.hostprovider          2.2.2    Host Location Provider
*  53 org.onosproject.lldpprovider          2.2.2    LLDP Link Provider
*  66 org.onosproject.drivers.gnoi          2.2.2    gNOI Drivers
*  70 org.onosproject.drivers.gnmi          2.2.2    gNMI Drivers
*  71 org.onosproject.pipelines.basic       2.2.2    Basic Pipelines
*  72 org.onosproject.drivers.stratum       2.2.2    Stratum Drivers
* 161 org.onosproject.gui2                  2.2.2    ONOS GUI2
* 181 org.onosproject.drivers.bmv2          2.2.2    BMv2 Drivers
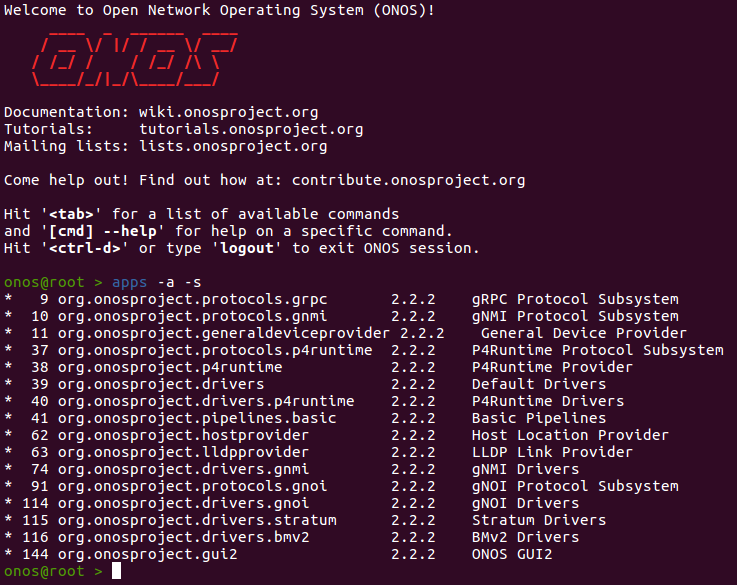
There are definitely more apps than defined in $ONOS_APPS. That’s
because each app in ONOS can define other apps as dependencies. When loading an
app, ONOS automatically resolves dependencies and loads all other required apps.
Disable link discovery service
Link discovery will be the focus of the next exercise. For now, this service lacks support in the P4 program. We suggest you deactivate it for the rest of this exercise, to avoid running into issues. Use the following ONOS CLI command to deactivate the link discovery service.
onos> app deactivate lldpprovider
To exit the ONOS CLI, use Ctrl-D. This will stop the CLI process
but will not affect ONOS itself.
Restart ONOS in case of errors
If anything goes wrong and you need to kill ONOS, you can use command make
restart to restart both Mininet and ONOS.
2. Build app and register pipeconf
Inside the app/ directory you will find a starter implementation of an ONOS app that includes a pipeconf. The pipeconf-related files are the following:
- PipeconfLoader.java: A component that registers the pipeconf at app activation;
- InterpreterImpl.java: An implementation of the
PipelineInterpreterdriver behavior; - PipelinerImpl.java: An implementation of the
Pipelinerdriver behavior;
To build the ONOS app (including the pipeconf), run the following command in the second terminal window:
$ make app-build
This will produce a binary file app/target/ngsdn-tutorial-1.0-SNAPSHOT.oar
that we will use to install the application in the running ONOS instance.
Use the following command to load the app into ONOS and activate it:
$ make app-reload
After the app has been activated, you should see the following messages in the
ONOS log (make onos-log) signaling that the pipeconf has been registered and
the different app components have been started:
INFO  [PiPipeconfManager] New pipeconf registered: org.onosproject.ngsdn-tutorial (fingerprint=...)
INFO  [MainComponent] Started

Alternatively, you can show the list of registered pipeconfs using the ONOS CLI
(make onos-cli) command:
onos> pipeconfs

3. Push netcfg to ONOS
Now that ONOS and Mininet are running, it’s time to let ONOS know how to reach the four switches and control them. We do this by using a configuration file located at mininet/netcfg.json, which contains information such as:
- The gRPC address and port associated with each Stratum device;
- The ONOS driver to use for each device,
stratum-bmv2in this case; - The pipeconf to use for each device,
org.onosproject.ngsdn-tutorialin this case, as defined in PipeconfLoader.java; - Configuration specific to our custom app (
fabricDeviceConfig)
This file also contains information related to the IPv6 configuration associated with each switch interface. We will discuss this information in more details in the next exercises.
On a terminal window, type:
$ make netcfg
This command will push the netcfg.json to ONOS, triggering discovery and
configuration of the 4 switches.
Check the ONOS log (make onos-log), you should see messages like:
INFO  [GrpcChannelControllerImpl] Creating new gRPC channel grpc:///mininet:50001?device_id=1...
...
INFO  [StreamClientImpl] Setting mastership on device:leaf1...
...
INFO  [PipelineConfigClientImpl] Setting pipeline config for device:leaf1 to org.onosproject.ngsdn-tutorial...
...
INFO  [GnmiDeviceStateSubscriber] Started gNMI subscription for 6 ports on device:leaf1
...
INFO  [DeviceManager] Device device:leaf1 port [leaf1-eth1](1) status changed (enabled=true)
INFO  [DeviceManager] Device device:leaf1 port [leaf1-eth2](2) status changed (enabled=true)
INFO  [DeviceManager] Device device:leaf1 port [leaf1-eth3](3) status changed (enabled=true)
INFO  [DeviceManager] Device device:leaf1 port [leaf1-eth4](4) status changed (enabled=true)
INFO  [DeviceManager] Device device:leaf1 port [leaf1-eth5](5) status changed (enabled=true)
INFO  [DeviceManager] Device device:leaf1 port [leaf1-eth6](6) status changed (enabled=true)
4. Use the ONOS CLI to verify the network configuration
Access the ONOS CLI using make onos-cli. Enter the following command to
verify the network config pushed before:
onos> netcfg
Devices
Verify that all 4 devices have been discovered and are connected:
onos> devices -s
id=device:leaf1, available=true, role=MASTER, type=SWITCH, driver=stratum-bmv2:org.onosproject.ngsdn-tutorial
id=device:leaf2, available=true, role=MASTER, type=SWITCH, driver=stratum-bmv2:org.onosproject.ngsdn-tutorial
id=device:spine1, available=true, role=MASTER, type=SWITCH, driver=stratum-bmv2:org.onosproject.ngsdn-tutorial
id=device:spine2, available=true, role=MASTER, type=SWITCH, driver=stratum-bmv2:org.onosproject.ngsdn-tutorial
Make sure you see available=true for all devices. That means ONOS has a gRPC
channel open to the device and the pipeline configuration has been pushed.
Ports
Check port information, obtained by ONOS by performing a gNMI Get RPC for the OpenConfig Interfaces model:
onos> ports -s device:spine1
id=device:spine1, available=true, role=MASTER, type=SWITCH, driver=stratum-bmv2:org.onosproject.ngsdn-tutorial
  port=[spine1-eth1](1), state=enabled, type=copper, speed=10000 , ...
  port=[spine1-eth2](2), state=enabled, type=copper, speed=10000 , ...
Check port statistics, also obtained by querying the OpenConfig Interfaces model via gNMI:
onos> portstats device:spine1
deviceId=device:spine1
   port=[spine1-eth1](1), pktRx=114, pktTx=114, bytesRx=14022, bytesTx=14136, pktRxDrp=0, pktTxDrp=0, Dur=173
   port=[spine1-eth2](2), pktRx=114, pktTx=114, bytesRx=14022, bytesTx=14136, pktRxDrp=0, pktTxDrp=0, Dur=173
Flow rules and groups
Check the ONOS flow rules. You should see three flow rules for each device. For
example, to show all flow rules installed so far on device leaf1:
onos> flows -s any device:leaf1
deviceId=device:leaf1, flowRuleCount=3
    ADDED, bytes=0, packets=0, table=IngressPipeImpl.acl_table, priority=40000, selector=[ETH_TYPE:arp], treatment=[immediate=[IngressPipeImpl.clone_to_cpu()]]
    ADDED, bytes=0, packets=0, table=IngressPipeImpl.acl_table, priority=40000, selector=[ETH_TYPE:ipv6, IP_PROTO:58, ICMPV6_TYPE:136], treatment=[immediate=[IngressPipeImpl.clone_to_cpu()]]
    ADDED, bytes=0, packets=0, table=IngressPipeImpl.acl_table, priority=40000, selector=[ETH_TYPE:ipv6, IP_PROTO:58, ICMPV6_TYPE:135], treatment=[immediate=[IngressPipeImpl.clone_to_cpu()]]
This list include flow rules installed by the ONOS built-in services such as
hostprovider. We’ll talk more about these services in the next exercise.
To show all groups installed so far, you can use the groups command. For
example to show groups on leaf1:
onos> groups any device:leaf1
deviceId=device:leaf1, groupCount=1
   id=0x63, state=ADDED, type=CLONE, bytes=0, packets=0, appId=org.onosproject.core, referenceCount=0
       id=0x63, bucket=1, bytes=0, packets=0, weight=-1, actions=[OUTPUT:CONTROLLER]
“Group” is an ONOS northbound abstraction that is mapped internally to different
types of P4Runtime entities. In this case, you should see 1 group of type
CLONE, internally mapped to a P4Runtime CloneSessionEntry, here used to
clone packets to the controller via packet-in. We’ll talk more about controller
packet-in/out in the next session.
5. Visualize the topology on the ONOS web UI
Using the ONF Cloud Tutorial Portal, access the ONOS UI. If you are running the VM on your laptop, open up a browser (e.g. Firefox) to http://127.0.0.1:8181/onos/ui.
When asked, use the username onos and password rocks.
You should see 4 devices in the topology view, corresponding to the 4 switches
of our 2x2 fabric. Press L to show device labels. Because link discovery is
not enabled, the ONOS UI will not show any links between the devices.
While here, feel free to interact with and discover the ONOS UI. For more information on how to use the ONOS web UI please refer to this guide:
https://wiki.onosproject.org/x/OYMg
There is a way to show the pipeconf details for a given device, can you find it?
Pipeconf UI
In the ONOS topology view click on one of the switches (e.g device:leaf1)
and the Device Details panel appears. In that panel click on the Pipeconf icon
(the last one), to open the Pipeconf view for that device.
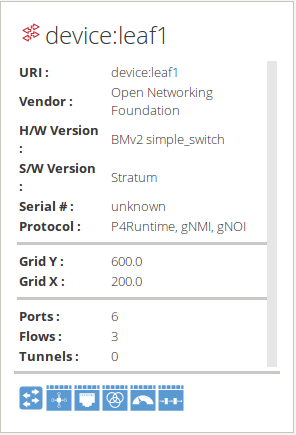
Here you will find info on the pipeconf currently used by the specific device, including details of the P4 tables.
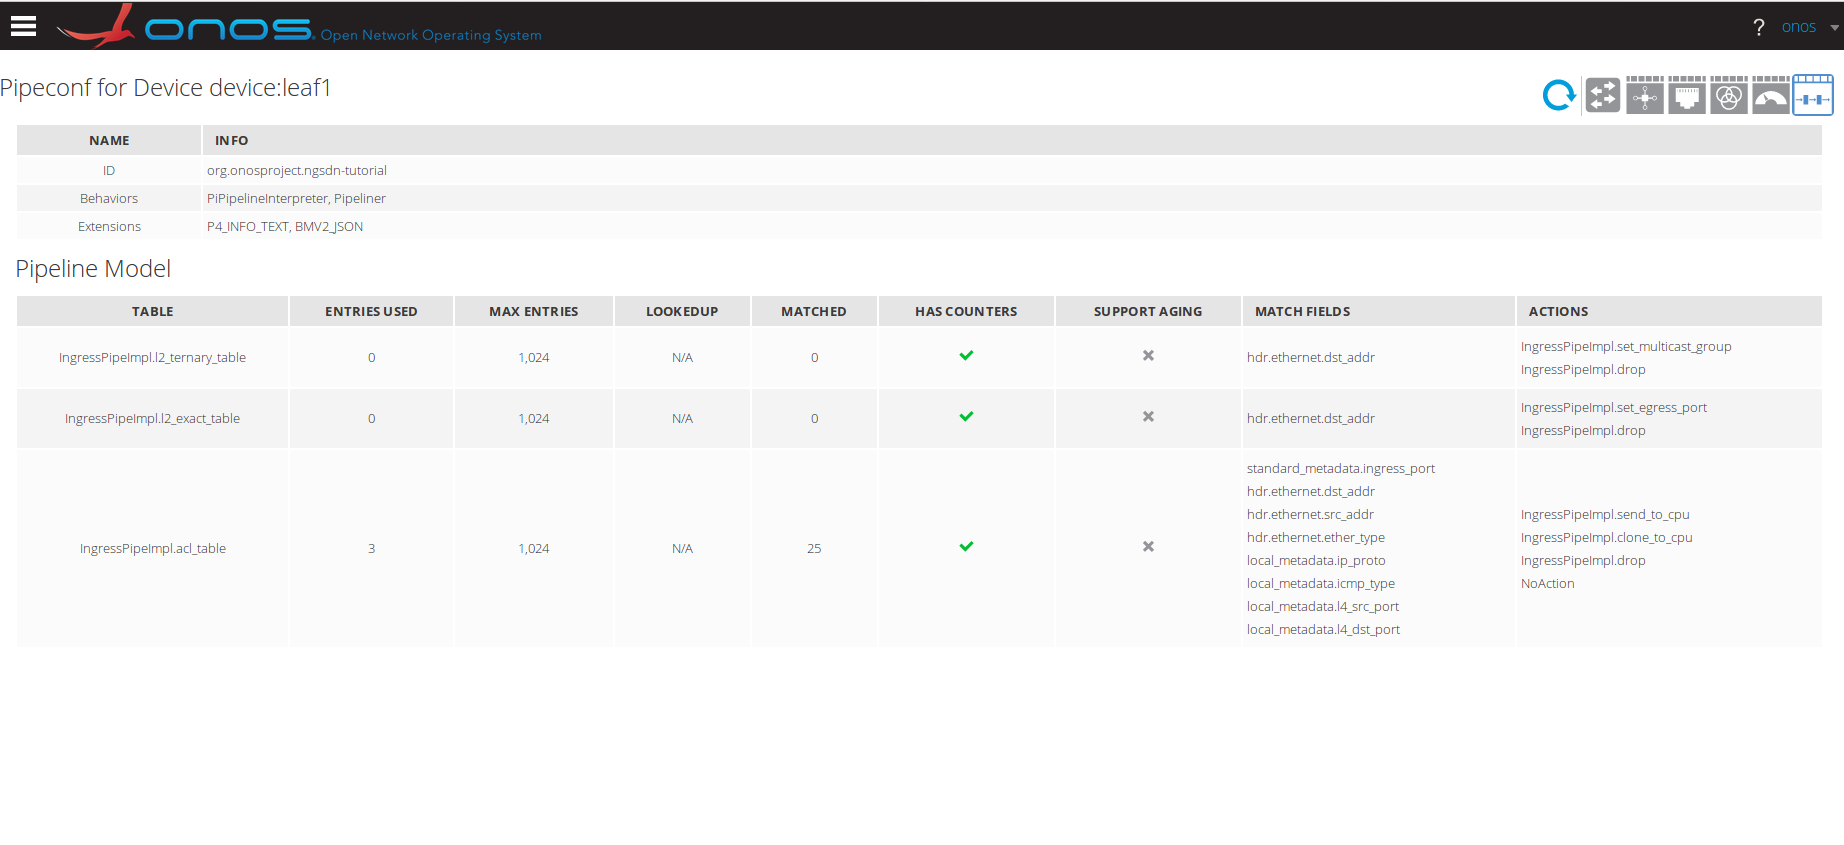
Clicking the table row brings up the details panel, showing details of the match fields, actions, action parameter bit widths, etc.
Congratulations!
You have completed the third exercise! If you’re feeling ambitious, you can do the extra credit steps below.
Extra Credit: Inspect stratum_bmv2 internal state
You can use the P4Runtime shell to dump all table entries currently installed on the switch by ONOS. In a separate terminal window, start a P4Runtime shell for leaf1:
$ util/p4rt-sh --grpc-addr localhost:50001 --election-id 0,1
On the shell prompt, type the following command to dump all entries from the ACL table:
P4Runtime sh >>> for te in table_entry["IngressPipeImpl.acl_table"].read():
            ...:     print(te)
            ...:
You should see exactly three entries, each one corresponding to a flow rule in ONOS. For example, the flow rule matching on NDP NS packets should look like this in the P4runtime shell:
table_id: 33557865 ("IngressPipeImpl.acl_table")
match {
  field_id: 4 ("hdr.ethernet.ether_type")
  ternary {
    value: "\\x86\\xdd"
    mask: "\\xff\\xff"
  }
}
match {
  field_id: 5 ("hdr.ipv6.next_hdr")
  ternary {
    value: "\\x3a"
    mask: "\\xff"
  }
}
match {
  field_id: 6 ("hdr.icmpv6.type")
  ternary {
    value: "\\x87"
    mask: "\\xff"
  }
}
action {
  action {
    action_id: 16782152 ("IngressPipeImpl.clone_to_cpu")
  }
}
priority: 40001
Extra Credit: Show ONOS gRPC log
ONOS provides a debugging feature that dumps all gRPC messages
exchanged with a device to a file. To enable this feature, type the
following command in the ONOS CLI (make onos-cli):
onos> cfg set org.onosproject.grpc.ctl.GrpcChannelControllerImpl enableMessageLog true
Check the content of directory tmp/onos in the ngsdn-tutorial root. You
should see many files, some of which starting with name grpc___mininet_. You
should see four such files, one file per device, named after the gRPC
port used to establish the gRPC chanel.
Check content of one of these files, you should see a dump of the gRPC messages in Protobuf Text format for messages like:
- P4Runtime
PacketInandPacketOut; - P4Runtime Read RPCs used to periodically dump table entries and read counters;
- gNMI Get RPCs to read port counters.
Remember to disable the gRPC message logging in ONOS when you’re done, to avoid affecting performances:
onos> cfg set org.onosproject.grpc.ctl.GrpcChannelControllerImpl enableMessageLog false
