This post will describe a setup to start working with test coverage. First of all, I would like to highlight the GitHub link of this project BraveCoverage
It is related to a very small piece of code to demonstrate how to start a project providing test coverage metrics. But why this is important? In resume, there are many reasons to do that but I would like to focus in one: The Quality of Your Job. When you provide unit tests for your code it means that you are a person concerned about the quality of your delivered work and want to improve your skills, for instance. And the way to know if you are testing all the lines is through code coverage tool.
The tool chosen to execute code coverage is Gcov, with this tool you will be able to know how many times the lines of your program was executed and if there are lines non executed by your tests cases. You can see the results provided by the gcov in the next image, basically it shows the total of line in your program and the lines runned by the test program, note highlighted in green all line tested and you can see also that some lines regarding to library have been included in analysis.
To demonstrates the usage of code coverage using Google Test, Gcov and Lcov a simple example was done in C++ language, it’s a simple class that add to integer values and the methods declaration can be seen afterward class, as you can see below. Please, considere that I am not concerned with a safety code, it was written just to demonstrante how to create a code coverage setup.
Class declaration:
class Sum
{
public:
    Sum() { };
    ~Sum() { };

    void setAValue(int A);
    void setBValue(int B);
    int executeSum(void);

private:
    int _A = 0;
    int _B = 0;
};
Methods definition:
void Sum::setAValue(int A) {
    _A = A;
}

void Sum::setBValue(int B) {
    _B = B;
}

int Sum::executeSum(void) {
    return _A + _B;
}
Regarding to the test case it is really simple, first an object is instantiated and the values are setted, afterwards the Google Test framework is called to compare if the sum operation was sucessfully executed, for this specific test case the operation is 10 + 10 = 20.
Test case:
TEST(BraveCoverage, TestCaseOne) {
    Sum SumUnderTest;
    SumUnderTest.setAValue(10);
    SumUnderTest.setBValue(10);

    EXPECT_EQ(20, SumUnderTest.executeSum());
}
It is also possible to see the test case result.
Test Results:
[==========] Running 1 test from 1 test case.
[----------] Global test environment set-up.
[----------] 1 test from BraveCoverage
[ RUN      ] BraveCoverage.TestCaseOne
[       OK ] BraveCoverage.TestCaseOne (0 ms)
[----------] 1 test from BraveCoverage (0 ms total)

[----------] Global test environment tear-down
[==========] 1 test from 1 test case ran. (0 ms total)
[  PASSED  ] 1 test.
To build the project you need to execute the following commands inside the test directory:
# mkdir build && cp build && cmake ..
# make init
# make gcov
# make lcov
The first line above just creates the build folder, join in it and executes cmake.
The “make init” step executes the clean command and removes the files generated by a previous “make gcov” command, this command should be executed ALWAYS before the next one because it is responsible for the build. Next step “make gcov” generates the metrics for code coverage, with this command is possible to see the results in prompt and the last but not least, the command “make lcov” produces a front end (html) to the test coverage results, it cosumes the *.gcno and *.gcda generated file through the previous command. Finally the “make lcov” uses the tool genhtml to group the html files generated in a hierarchical way.
Below you can see the CMakeFiles.txt snippets that references the commands described before.
CMakeLists.txt (make init)
add_custom_target(init
    COMMAND ${CMAKE_MAKE_PROGRAM} clean
    COMMAND rm -f ${OBJECT_DIR}/*.gcno
    COMMAND rm -f ${OBJECT_DIR}/*.gcda
    WORKING_DIRECTORY ${CMAKE_BINARY_DIR}
    )
CMakeLists.txt (make gcov):
add_custom_command(TARGET gcov
    COMMAND echo "=================== GCOV ===================="
    COMMAND gcov -b ${CMAKE_SOURCE_DIR}/src/*.cpp -o ${OBJECT_DIR}
    COMMAND echo "-- Source diretorie: ${CMAKE_SOURCE_DIR}/src/"
    COMMAND echo "-- Coverage files have been output to ${CMAKE_BINARY_DIR}/gcoverage"
    WORKING_DIRECTORY ${CMAKE_BINARY_DIR}/gcoverage
    )
CMakeLists.txt (make lcov):
add_custom_command(TARGET lcov
    COMMAND echo "=================== LCOV ===================="
    COMMAND echo "-- Passing lcov tool under code coverage"
    COMMAND lcov --capture --directory ../ --output-file lcoverage/main_coverage.info
    COMMAND echo "-- Generating HTML output files"
    COMMAND genhtml lcoverage/main_coverage.info --output-directory lcoverage
    )
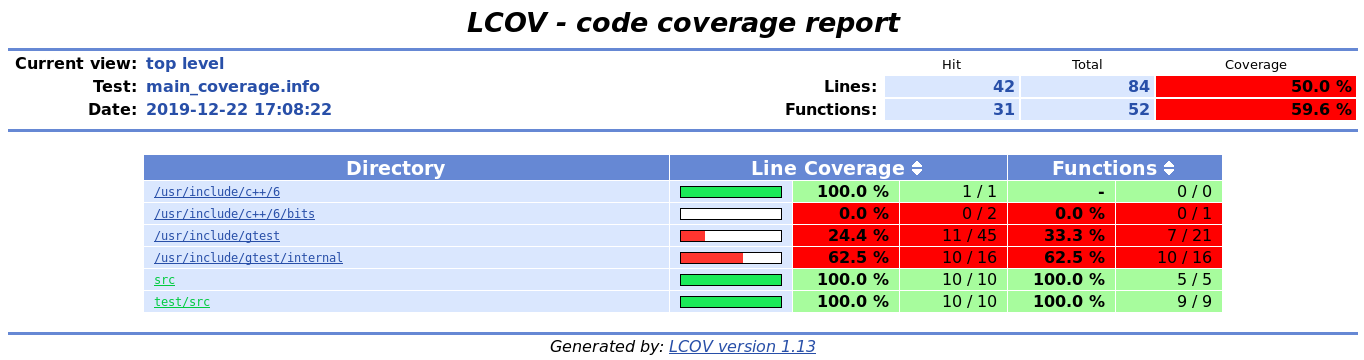
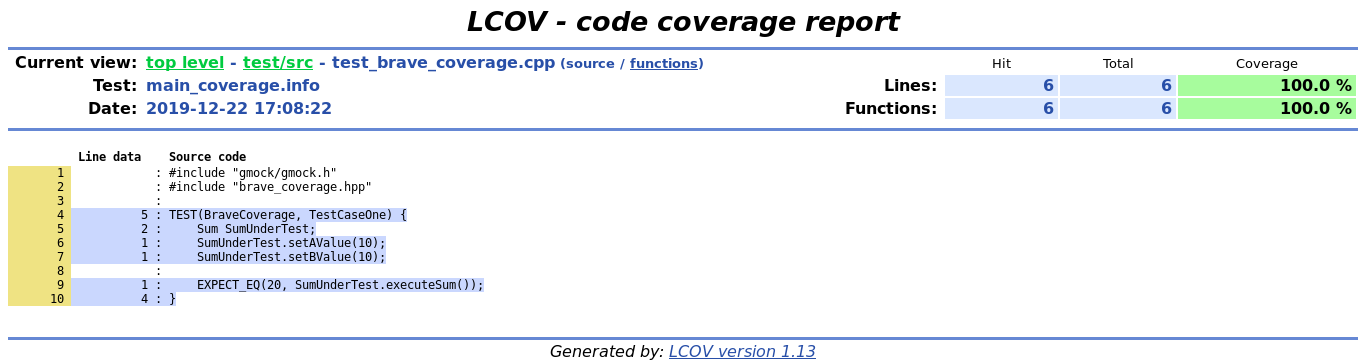
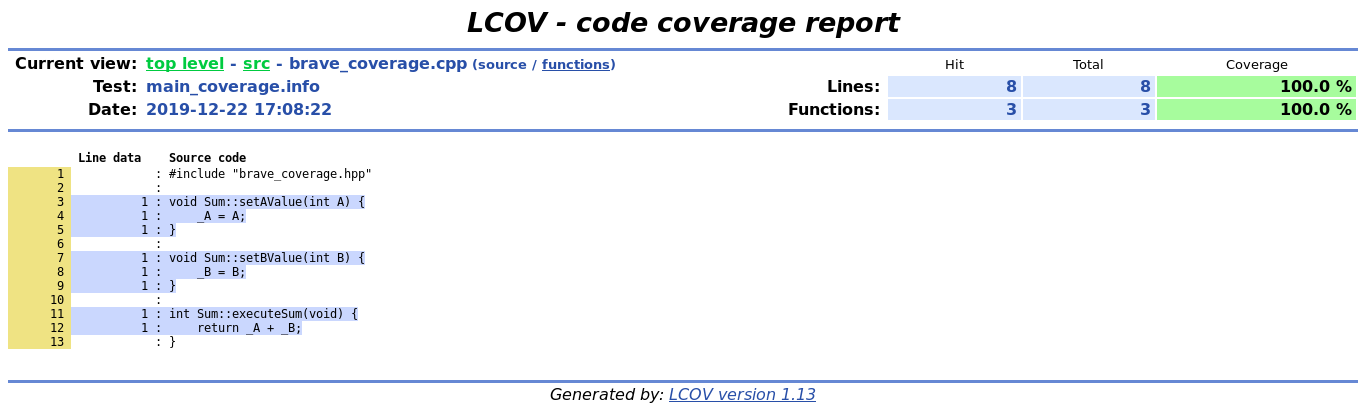
The results for the code coverage execution can be seen in the four images below, it was executed for four modules located in src and test/src projetc directories. In the first two images is possible to see the result for the test modules itself and the last two images are related to the project core, it means the main program. For reasons of quality, the module brave_coverage should be focused in the code coverage results.


To study this test case, please go to the oficial git page and clone/download it, follow the instructions to build the project. Maybe you will want to adapt it for your personal project, feel free to do that and have fun.
